Scheduling Construction

Scheduling Construction
Designing a scheduling feature for a construction tech startup
Background
I worked on this project at Avvir, which is a construction tech startup that allows construction teams to track progress and problems to save costs in rework. Our company scans our clients’ construction sites to create a digital 3D model of the building (Building Information Model, or BIM), which clients can access in our web app to compare and contrast the planned and the actual progress. Our app would show the current BIM, and allow for interacting with various parts of the model in various modes, such asquality control mode, where we ensure the building elements are in the right place, thebuilt/not-built mode, which showed which elements were built and not built yet, thefull bim mode,which showed the entire planned BIM, etc.
A construction project is a complex project that requires multidisciplinary teams working together, whose jobs often are dependent on other work that comes before theirs. This, in addition to the fact that day laborers who do the manual work are often paid by the hour means time coordination and scheduling is highly important.

An example of a building information model (source)
A rotating view of a BIM in the the Avvir web app
Problem
Because of the complexity of coordinating multiple construction teams, we wanted to create a scheduling aspect to our 3D digital building software to further help teams coordinate work and make sure the work that is completed is done correctly. Our CEO’s vision of the scheduling system was one that incorporated existing construction scheduling software, such as Primavera P6, or MS Project into our app, while also allowing it to be dynamically updated, and to provide estimates based on the velocity of work done.

When conducting remote user-testing and research sessions I often used the conference rooms at A/D/O, the space for companies like ours that were in the Urban-X Accelerator program for tech startups reimagining city life.
My goal, as the Design lead was to understand construction professionals’ needs and behavior, to design a scheduling system for our app that tracked progress and estimated future progress, and to test and iterate on these designs with construction professionals. While I write this case study in a generally linear manner, the project itself was not at all linear, often requiring me to backtrack or reiterate on previous steps.
Research
Having little experience with the construction industry, let alone this specific topic in construction management, I started on a variety of research endeavors including domain research about the industry as a whole, competitor research about companies doing similar things as we were, and user research on actual users and others who worked with our users. Questions that came up were put into a Google spreadsheet and systematically tracked and answered as the project progressed.
Because of the paucity of time and available participants, my user research was often mixed in with user tests. I would start a session with either a user test for existing features or questions for the participant, switching the order when appropriate. Over the course of the project I conducted around 10-15 user research and user testing sessions.
Sometimes, I would listen in on conference calls with clients to understand their pain points and occasionally ask questions. Several times I visited the construction site office for one of our major clients to sit in on meetings and talk to construction professionals there of different trades. In sitting in on the planning & scheduling meetings, I got a deeper understanding of the construction industry as well had a chance to understand their wishes and pain points on using our product.
When conducting remote user-testing and research sessions I often used the conference rooms at A/D/O, the space for companies like ours that were in the Urban-X Accelerator program for tech startups reimagining city life.

I attended a site visit meeting which revealed a slightly chaotic but interdisciplinary nature of various construction trades working together.

I sat in on several planning and scheduling meetings where the schedules were made and tasks were divvied up or pushed back based on the project progress
Findings
From my research, I learnt how construction teams, projects, and the industry worked. There are numerous processes that go into creating and updating schedules and different schedules are shown to different stakeholders in the project. There are also a variety of methods of creating different types of schedules and the whole process of updating them is rather complex.
Master schedules are the original schedules at the start of the project that contain everything from start to finish in a relatively granular detail in programs such as MS Project or Primavera P6. These schedules provide a baseline, against which updated schedules are compared against to see how the project is progressing. Then there are summary schedules that show a simpler look filled with milestones that indicate a completion of a particular stage. These are often shown to project owners or shown to subcontractors and suppliers. Finally there are also lookahead schedules, which are updated regularly by the trades staff and are the most granular and allows people to see how each task is progressing.
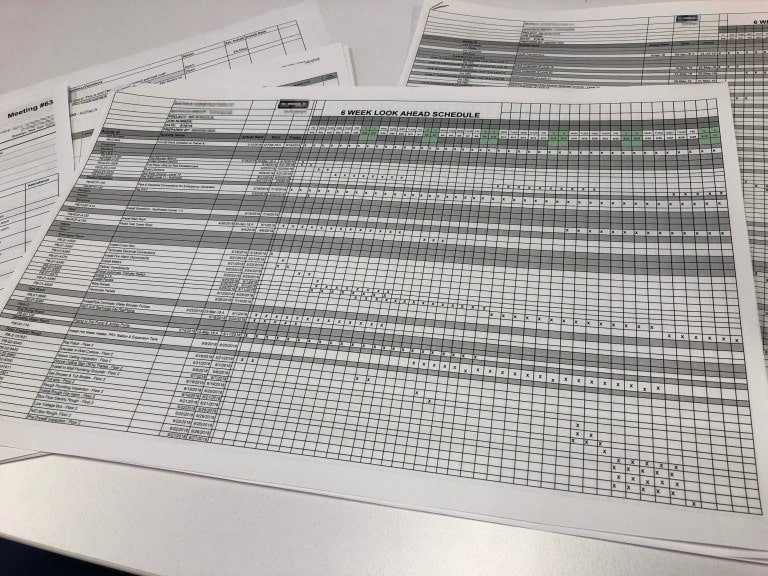
An example of a lookahead schedule. I found that oftentimes people simply used spreadsheets because they were simpler than the more complex scheduling programs that demanded detail.
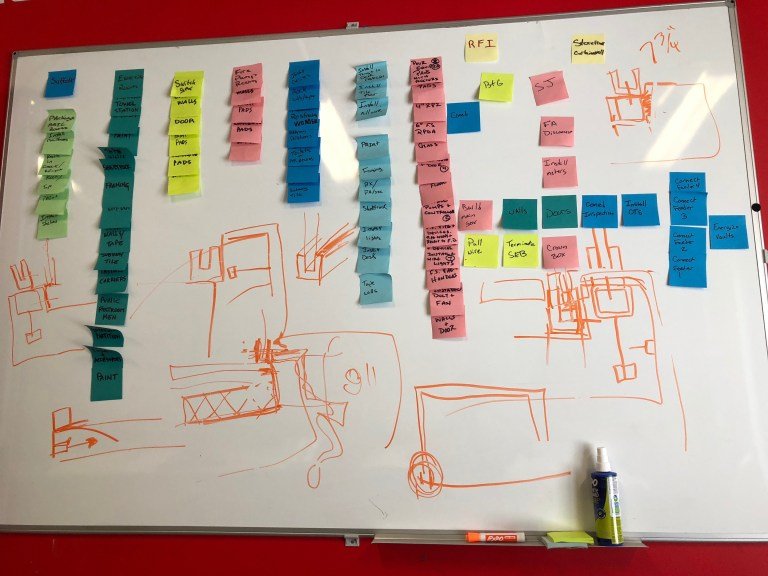
An example of a board after a pull-planning meeting to create a lookahead schedule.

This flow chart shows the process by which changes are made to the schedule. Multiple stakeholders and actors review and pass on requests until the schedule is changed. From this revelation, it became apparent that we might have multiple users per client account interacting with the schedule and that certain tasks or sections of the schedules might not be available to all users in our web app.
Ideation
With my research in mind, I started laying out requirements, user flows, and priortizing features to get an idea of how the design of this scheduling feature might look like.
Requirements Gathering
From my research and usertesting sessions with construction professionals, and with discussions with our team and CEO, I outlined a variety of requirements for our scheduling system. Most importantly, we would need to be able to import schedules from existing schedule-making tools, and to be able to edit these schedules in the app, as users had consistently said “If you can cut out the middleman [i.e. the schedule-making tool], that would make things a whole lot easier.”
In addition, we would need to add scan date indicators to show when each construction site item was scanned, i.e. how up-to-date each scheduled work item is. In addition, users wanted progress represented by trades (electric, mechanical, architectural, etc), and by individual work item (install floor slab, pour in concrete, etc).

A user story map for a user updating the schedule in our app. Features are broken into discrete user stories that the development team can work on.
Requirements Gathering
After research with construction professionals, both direct users and those who work with the users on issues related to scheduling, I consulted with our team to identify which features to work on. There were many potential features in this complicated problem, and we wouldn’t be able to build them all, from a time standpoint and from a coding standpoint.
After some thinking, we decided that while we originally thought of the scheduling system as a separate mode, having one task on each of the various modes on our software, with one mode devoted entirely to the timeline, but after some research and testing, we realized users wanted to be able to access the schedule no matter which mode they were on. Also, schedules were not technically a mode of interaction with the BIM model, but rather a way of accessing the data contained within, and didn’t make as much sense as a stand-alone mode.

Designs & Iterations
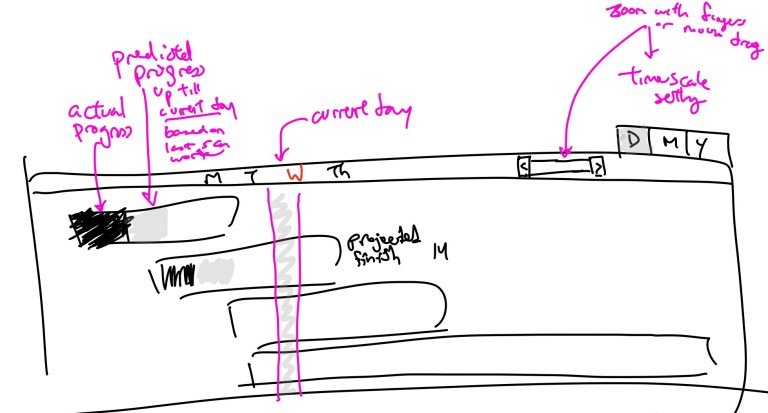
I started sketching wireframes, while consulting with our CEO and development team to see the feasibility and ensure focus. Some issues we tackled included the multiple timelines of planned, current, and projected progress, as well as how to measure progress (whether it should be percentage complete, or by units relevant to the tasks). For each design iteration, I started with a sketch of the overall layout and features and consulted with our team to see if there were any constraints or concerns, before creating a high fidelity mockup for the purpose of testing. I worked on creating two versions of schedules, one of progress-by-trades (mechanical, architectural, electrical, etc), and one of progress-by-work-item. Below are some of the major stages of designs and iterations over a four month period.
V1. Progress by trade side bar
The first design was created under the constraint of an upcoming potential client demonstration. As such, I only created the design for progress-by-trade view. At the time, several users I had interviewed mentioned this would be very helpful.


V2. Progress by trade & progress by work item panel
After further user research and testing, it became apparent that users wanted to be able to hide and show the schedule. I designed the progress-by-trade and progress-by-work item modes and had them live at the bottom of the screen. I used reds and dark yellow to indicate more information such as whether an item was behind or almost behind schedule.


V3. Simper colors and scan timelines
Feedback from the previous designs suggested that filling in the entirety of the remaining bars as a dark red or dark yellow was confusing—people thought this meant that the item was complete because the bar had been filled in. Because of this, I updated the bar to only indicate completed, projected per selected period, and incomplete. In addition, I removed the rounded edges on the Gantt chart bars as users thought progress was more easily understood with a flat line than a rounded edge.
As we started to incorporate scan information into our product, I also added a scan timeline to navigate past building scans. By navigating with this bar, users could see what the schedules and BIMs looked like at various periods.

Final Designs — Incorporating critical paths, milestones, and further simplifying the schedule
For the final stage designs, I included milestones (the diamonds), which users started asking for, and critical paths (the red arrows), which are important for construction project management. Critical paths are also commonly found in scheduling programs and should be able to be imported once we get the import function developed.
Next, I also removed the scan timeline to add only the latest scan on each of the work items in the progress-by-work-item schedule. This was because customers only needed to see when the item in the work item was last updated by a scan, not all the scans ever done on that item. In addition, adding it on the bar itself made the information readily accessible and located where the users expected to find them. Finally, we added the Avvir projection functionality that allows users to see how soon or late we predict their work items will be completed based on their work velocity, as well as an option to update the schedule.


Epilogue
At the time of writing, this design seems pretty stabilized as users found the UI intuitive and usable with a little primer on the work projection functionality. This suggests that we might add an onboarding feature to walk new users through the processes, but after that the schedule UI should be easy to navigate. Another feature not shown here but related are information modals that appear when selecting a work item, as well as the highlighting of elements related to said work items. In sum, this project was rather complicated but was an excellent experience in gathering information about a complex subject and brainstorming, designing, and iterating it in a clearer, intuitive manner.
